Be yourself; Everyone else is already taken.
— Oscar Wilde.
This is the first post on my new blog. I’m just getting this new blog going, so stay tuned for more. Subscribe below to get notified when I post new updates.
Automation – devOps, data engineering, python
data engineering at scale
Be yourself; Everyone else is already taken.
— Oscar Wilde.
This is the first post on my new blog. I’m just getting this new blog going, so stay tuned for more. Subscribe below to get notified when I post new updates.
Stack used: Terraform, kubectl, YAML, Redis cluster, Python & Go Lang
Initialize terraform:
(base) skondla@skondla-mac:~/myStage/k8s/gcp/k8sEgine$ terraform init

Initializing the backend...

Initializing provider plugins...
- Checking for available provider plugins...
- Downloading plugin for provider "google" (hashicorp/google) 3.13.0...


* provider.google: version = "~> 3.13"

Terraform has been successfully initialized!
Before apply dry run terraform with “plan” option
(base) skondla@skondla-mac:~/myStage/k8s/gcp/k8sEgine$ terraform plan --out myplan
Refreshing Terraform state in-memory prior to plan...
The refreshed state will be used to calculate this plan, but will not be
persisted to local or remote state storage.


------------------------------------------------------------------------

An execution plan has been generated and is shown below.
Resource actions are indicated with the following symbols:
  + create

Terraform will perform the following actions:

  # google_container_cluster.gke-cluster will be created
  + resource "google_container_cluster" "gke-cluster" {
      + additional_zones            = (known after apply)
      + cluster_ipv4_cidr           = (known after apply)
      + default_max_pods_per_node   = (known after apply)
      + enable_binary_authorization = false
      + enable_intranode_visibility = (known after apply)
      + enable_kubernetes_alpha     = false
      + enable_legacy_abac          = false
      + enable_tpu                  = (known after apply)
      + endpoint                    = (known after apply)
      + id                          = (known after apply)
      + initial_node_count          = 3
      + instance_group_urls         = (known after apply)
      + label_fingerprint           = (known after apply)
      + location                    = "us-east1-b"
      + logging_service             = "logging.googleapis.com/kubernetes"
      + master_version              = (known after apply)
      + monitoring_service          = "monitoring.googleapis.com/kubernetes"
      + name                        = "my-first-gke-cluster"

.............
.............
............
terraform apply to create/modify k8s stack
(base) skondla@skondla-mac:~/myStage/k8s/gcp/k8sEgine$ terraform apply "myplan"
google_container_cluster.gke-cluster: Creating...
google_container_cluster.gke-cluster: Still creating... [10s elapsed]
google_container_cluster.gke-cluster: Still creating... [20s elapsed]
google_container_cluster.gke-cluster: Still creating... [30s elapsed]
google_container_cluster.gke-cluster: Still creating... [40s elapsed]
google_container_cluster.gke-cluster: Still creating... [50s elapsed]
google_container_cluster.gke-cluster: Still creating... [1m0s elapsed]
google_container_cluster.gke-cluster: Still creating... [1m10s elapsed]
google_container_cluster.gke-cluster: Still creating... [1m20s elapsed]
google_container_cluster.gke-cluster: Still creating... [1m30s elapsed]
google_container_cluster.gke-cluster: Still creating... [1m40s elapsed]
google_container_cluster.gke-cluster: Still creating... [1m50s elapsed]
google_container_cluster.gke-cluster: Still creating... [2m0s elapsed]
google_container_cluster.gke-cluster: Still creating... [2m10s elapsed]
google_container_cluster.gke-cluster: Still creating... [2m20s elapsed]
google_container_cluster.gke-cluster: Still creating... [2m30s elapsed]
google_container_cluster.gke-cluster: Still creating... [2m40s elapsed]
google_container_cluster.gke-cluster: Still creating... [2m50s elapsed]
google_container_cluster.gke-cluster: Still creating... [3m0s elapsed]
google_container_cluster.gke-cluster: Creation complete after 3m1s [id=projects/amplified-name-270419/locations/us-east1-b/clusters/my-first-gke-cluster]

Apply complete! Resources: 1 added, 0 changed, 0 destroyed.
Now Connect to google cloud and browser based authentication from a token
(base) skondla@skondla-mac:~/myStage/k8s/gcp/k8sEgine$ gcloud auth login
Your browser has been opened to visit:

    https://accounts.google.com/o/oauth2/auth?................................................................................................................
Set the project & get creds
(base) skondla@skondla-mac:~/myStage/k8s/gcp/k8sEgine$ gcloud config set project myk8s-project
Updated property [core/project].
(base) skondla@skondla-mac:~/myStage/k8s/gcp/k8sEgine$ gcloud container clusters get-credentials my-first-gke-cluster --zone us-east1-b --project myk8s-project
Fetching cluster endpoint and auth data.
kubeconfig entry generated for my-first-gke-cluster.
(base) skondla@skondla-mac:~/myStage/k8s/gcp/k8sEgine$
Add extra pool
(base) skondla@skondla-mac:~/myStage/k8s/gcp/k8sEgine$ cat nodepool.tf
resource "google_container_node_pool" "extra-pool" {
  name               = "extra-node-pool"
  location           = "us-east1-b"
  cluster            = google_container_cluster.gke-cluster.name
  initial_node_count = 3
}

(base) skondla@skondla-mac:~/myStage/k8s/gcp/k8sEgine$ terraform apply "myplan"
google_container_node_pool.extra-pool: Creating...
google_container_node_pool.extra-pool: Still creating... [10s elapsed]
google_container_node_pool.extra-pool: Still creating... [20s elapsed]
google_container_node_pool.extra-pool: Still creating... [30s elapsed]
google_container_node_pool.extra-pool: Still creating... [40s elapsed]
google_container_node_pool.extra-pool: Still creating... [50s elapsed]
google_container_node_pool.extra-pool: Creation complete after 58s [id=projects/myk8s-project/locations/us-east1-b/clusters/my-first-gke-cluster/nodePools/extra-node-pool]
Apply complete! Resources: 1 added, 0 changed, 0 destroyed.
Deploy Redis
(base) skondla@skondla-mac:~/myStage/k8s/gcp/k8sEgine/examples/guestbook$ cat redis-master-deployment.yaml

apiVersion: apps/v1 #  for k8s versions before 1.9.0 use apps/v1beta2  and before 1.8.0 use extensions/v1beta1
kind: Deployment
metadata:
  name: redis-master
spec:
  selector:
    matchLabels:
      app: redis
      role: master
      tier: backend
  replicas: 1
  template:
    metadata:
      labels:
        app: redis
        role: master
        tier: backend
    spec:
      containers:
      - name: master
        image: k8s.gcr.io/redis:e2e  # or just image: redis
        resources:
          requests:
            cpu: 100m
            memory: 100Mi
        ports:
        - containerPort: 6379
(base) skondla@skondla-mac:~/myStage/k8s/gcp/k8sEgine/examples/guestbook$ kubectl create -f \
>     redis-master-deployment.yaml
deployment.apps/redis-master created
(base) skondla@skondla-mac:~/myStage/k8s/gcp/k8sEgine/examples/guestbook$ kubectl get pods
NAME                           READY   STATUS              RESTARTS   AGE
redis-master-596696dd4-plxh9   0/1     ContainerCreating   0          10s
(base) skondla@skondla-mac:~/myStage/k8s/gcp/k8sEgine/examples/guestbook$ cat redis-master-service.yaml
apiVersion: v1
kind: Service
metadata:
  name: redis-master
  labels:
    app: redis
    role: master
    tier: backend
spec:
  ports:
  - port: 6379
    targetPort: 6379
  selector:
    app: redis
    role: master
    tier: backend
(base) skondla@skondla-mac:~/myStage/k8s/gcp/k8sEgine/examples/guestbook$ kubectl create -f \
>     redis-master-service.yaml
service/redis-master created
(base) skondla@skondla-mac:~/myStage/k8s/gcp/k8sEgine/examples/guestbook$ kubectl get service
NAME           TYPE        CLUSTER-IP      EXTERNAL-IP   PORT(S)    AGE
kubernetes     ClusterIP   10.27.240.1     <none>        443/TCP    17m
redis-master   ClusterIP   10.27.249.158   <none>        6379/TCP   6s
(base) skondla@skondla-mac:~/myStage/k8s/gcp/k8sEgine/examples/guestbook$ cat redis-slave-deployment.yaml
apiVersion: apps/v1 #  for k8s versions before 1.9.0 use apps/v1beta2  and before 1.8.0 use extensions/v1beta1
kind: Deployment
metadata:
  name: redis-slave
spec:
  selector:
    matchLabels:
      app: redis
      role: slave
      tier: backend
  replicas: 2
  template:
    metadata:
      labels:
        app: redis
        role: slave
        tier: backend
    spec:
      containers:
      - name: slave
        image: gcr.io/google_samples/gb-redisslave:v1
        resources:
          requests:
            cpu: 100m
            memory: 100Mi
        env:
        - name: GET_HOSTS_FROM
          value: dns
          # If your cluster config does not include a dns service, then to
          # instead access an environment variable to find the master
          # service's host, comment out the 'value: dns' line above, and
          # uncomment the line below:
          # value: env
        ports:
        - containerPort: 6379
(base) skondla@skondla-mac:~/myStage/k8s/gcp/k8sEgine/examples/guestbook$ kubectl create -f \
>     redis-slave-deployment.yaml
deployment.apps/redis-slave created
(base) skondla@skondla-mac:~/myStage/k8s/gcp/k8sEgine/examples/guestbook$ kubectl get pods
NAME                           READY   STATUS              RESTARTS   AGE
redis-master-596696dd4-plxh9   1/1     Running             0          84s
redis-slave-96685cfdb-bl8bs    0/1     ContainerCreating   0          7s
redis-slave-96685cfdb-nx8v5    0/1     ContainerCreating   0          7s
(base) skondla@skondla-mac:~/myStage/k8s/gcp/k8sEgine/examples/guestbook$ cat redis-slave-service.yaml
apiVersion: v1
kind: Service
metadata:
  name: redis-slave
  labels:
    app: redis
    role: slave
    tier: backend
spec:
  ports:
  - port: 6379
  selector:
    app: redis
    role: slave
    tier: backend
(base) skondla@skondla-mac:~/myStage/k8s/gcp/k8sEgine/examples/guestbook$ kubectl create -f \
>     redis-slave-service.yaml
service/redis-slave created
(base) skondla@skondla-mac:~/myStage/k8s/gcp/k8sEgine/examples/guestbook$ kubectl get service
NAME           TYPE        CLUSTER-IP      EXTERNAL-IP   PORT(S)    AGE
kubernetes     ClusterIP   10.27.240.1     <none>        443/TCP    19m
redis-master   ClusterIP   10.27.249.158   <none>        6379/TCP   83s
redis-slave    ClusterIP   10.27.251.180   <none>        6379/TCP   11s
Deploy Python docker container:
Build python docker container
(base) skondla@skondla-mac:~/myStage/k8s/gcp/k8sEgine/webApp$ docker build -t dbwebapi .

(base) skondla@skondla-mac:~/myStage/k8s/gcp/k8sEgine/webApp$ docker images|grep db
dbwebapi                                                                  latest                                           680b96d2e4f7        10 seconds ago      993MB

(base) skondla@skondla-mac:~/myStage/k8s/gcp/k8sEgine/webApp$ docker tag dbwebapi gcr.io/${PROJECT_ID}/dbwebapi:v1

(base) skondla@skondla-mac:~/myStage/k8s/gcp/k8sEgine/webApp$ docker push gcr.io/${PROJECT_ID}/dbwebapi:v1
The push refers to repository [gcr.io/amplified-name-270419/dbwebapi]
69c2e602b3ad: Pushed
a61e41f4f360: Pushed
041654b625c6: Pushed
e04910a132ed: Pushed
485799b4fb7a: Pushed
4be1e4b7b0b1: Pushed
e90afb708b27: Pushed
b32c3fe9bc49: Pushed
132d53d2fcf6: Pushed
74ef248fc7e3: Pushed
4bb171da3c44: Pushed
.........
v1: digest: sha256:58cbc88b3afffd15ca5365a890e1a61c9e8aaa5fd9fd60ee4f153f34456b7caf size: 3687

(base) skondla@skondla-mac:~/myStage/k8s/gcp/k8sEgine/webApp$ kubectl create deployment dbwebapi --image=gcr.io/amplified-name-270419/dbwebapi:v1
deployment.apps/dbwebapi created

(base) skondla@skondla-mac:~/myStage/k8s/gcp/k8sEgine/webApp$ kubectl get pods
NAME                           READY   STATUS    RESTARTS   AGE
dbwebapi-7d8bbbb76b-74rdz      1/1     Running   0          20s
dbwebapi-7d8bbbb76b-8xc9l      1/1     Running   0          20s
dbwebapi-7d8bbbb76b-m9dtb      1/1     Running   0          20s
frontend-69859f6796-8qxh2      1/1     Running   0          75m
frontend-69859f6796-jb4w2      1/1     Running   0          75m
frontend-69859f6796-r5z6j      1/1     Running   0          75m
redis-master-596696dd4-plxh9   1/1     Running   0          77m
redis-slave-96685cfdb-bl8bs    1/1     Running   0          76m
redis-slave-96685cfdb-nx8v5    1/1     Running   0          76m
(base) skondla@skondla-mac:~/myStage/k8s/gcp/k8sEgine/webApp$ kubectl get services
NAME           TYPE           CLUSTER-IP      EXTERNAL-IP     PORT(S)        AGE
frontend       LoadBalancer   10.27.247.228   34.74.109.101   80:30893/TCP   75m
kubernetes     ClusterIP      10.27.240.1     <none>          443/TCP        96m
redis-master   ClusterIP      10.27.249.158   <none>          6379/TCP       78m
redis-slave    ClusterIP      10.27.251.180   <none>          6379/TCP       76m

(base) skondla@skondla-mac:~/myStage/k8s/gcp/k8sEgine$ kubectl expose deployment dbwebapi --type=LoadBalancer --port 25000 --target-port 25443
service/dbwebapi exposed

(base) skondla@skondla-mac:~/myStage/k8s/gcp/k8sEgine/webApp$ kubectl get services
NAME               TYPE           CLUSTER-IP      EXTERNAL-IP     PORT(S)           AGE
dbwebapi           LoadBalancer   10.27.241.175   <pending>       25000:31014/TCP   12s
frontend           LoadBalancer   10.27.247.228   34.74.109.101   80:30893/TCP      77m
kubernetes         ClusterIP      10.27.240.1     <none>          443/TCP           97m
redis-master       ClusterIP      10.27.249.158   <none>          6379/TCP          80m
redis-slave        ClusterIP      10.27.251.180   <none>          6379/TCP          78m

(base) skondla@skondla-mac:~/myStage/k8s/gcp/k8sEgine/webApp$ kubectl get services
NAME               TYPE           CLUSTER-IP      EXTERNAL-IP      PORT(S)           AGE
dbwebapi           LoadBalancer   10.27.241.175   34.74.237.60     25000:31014/TCP   62s
frontend           LoadBalancer   10.27.247.228   34.74.109.101    80:30893/TCP      79m
kubernetes         ClusterIP      10.27.240.1     <none>           443/TCP           99m
redis-master       ClusterIP      10.27.249.158   <none>           6379/TCP          81m
redis-slave        ClusterIP      10.27.251.180   <none>           6379/TCP          80m
Build hello-web docker image
(base) skondla@skondla-mac:~/myStage/k8s/gcp/k8sEgine/kubernetes-engine-samples/hello-app$ docker build -t gcr.io/${PROJECT_ID}/hello-app:v1 .

Successfully built 929d000392a8
Successfully tagged gcr.io/amplified-name-270419/hello-app:v1
Deploying hello-web
(base) skondla@skondla-mac:~/myStage/k8s/gcp/k8sEgine/webApp$ kubectl create deployment hello-web --image=gcr.io/${PROJECT_ID}/hello-app:v1
deployment.apps/hello-web created


(base) skondla@skondla-mac:~/myStage/k8s/gcp/k8sEgine/webApp$ kubectl expose deployment hello-web --type=LoadBalancer --port 80 --target-port 8080
service/hello-web exposed
Expose redis with LoadBalancer so you can query on Public IP (not required – use private IP for dB access)
(base) skondla@skondla-mac:~/apps/redis/src$ ./redis-cli -h 34.73.182.12
34.73.182.12:6379> ping
PONG
34.73.182.12:6379> exit
(base) skondla@skondla-mac:~/apps/redis/src$ ./redis-cli -h 34.73.182.12 get
(error) ERR wrong number of arguments for 'get' command
(base) skondla@skondla-mac:~/apps/redis/src$ ./redis-cli -h 34.73.182.12 KEYS '*'
1) "messages"
(base) skondla@skondla-mac:~/apps/redis/src$ ./redis-cli -h 34.73.182.12 get messages
",Hello"
(base) skondla@skondla-mac:~/apps/redis/src$ ./redis-cli -h 34.73.182.12 get messages
",Hello,Hi, Sudheer - How are doing?"
(base) skondla@skondla-mac:~/apps/redis/src$
Test hello-web
(base) skondla@skondla-mac:~/myStage/k8s/gcp/k8sEgine/webApp$ curl -l http://35.237.106.75:80
Hello, world!
Version: 1.0.0
Hostname: hello-web-bf98759f7-92fgc
(base) skondla@skondla-mac:~/myStage/k8s/gcp/k8sEgine/webApp$
Testing dbwebAPI app (Python App)
https://34.74.237.60:25000/xxx
Python DB Web API app is successfully deployed on GCP Kubernetes Cluster
Redis container Logs
(base) skondla@skondla-mac:~/myStage/k8s/gcp/k8sEgine$ kubectl get pods
NAME                           READY   STATUS    RESTARTS   AGE
dbwebapi-676c645974-fpjr8      1/1     Running   0          4h17m
frontend-69859f6796-29hr8      1/1     Running   0          5h24m
frontend-69859f6796-4jlwh      1/1     Running   0          5h24m
frontend-69859f6796-88f4r      1/1     Running   0          5h24m
redis-master-596696dd4-zcrdb   1/1     Running   0          5h27m
redis-slave-96685cfdb-8l4hq    1/1     Running   0          5h25m
redis-slave-96685cfdb-c266k    1/1     Running   0          5h25m
(base) skondla@skondla-mac:~/myStage/k8s/gcp/k8sEgine$ kubectl logs redis-master-596696dd4-zcrdb
                _._
           _.-``__ ''-._
      _.-``    `.  `_.  ''-._           Redis 2.8.19 (00000000/0) 64 bit
  .-`` .-```.  ```\/    _.,_ ''-._
 (    '      ,       .-`  | `,    )     Running in stand alone mode
 |`-._`-...-` __...-.``-._|'` _.-'|     Port: 6379
 |    `-._   `._    /     _.-'    |     PID: 1
  `-._    `-._  `-./  _.-'    _.-'
 |`-._`-._    `-.__.-'    _.-'_.-'|
 |    `-._`-._        _.-'_.-'    |           http://redis.io
  `-._    `-._`-.__.-'_.-'    _.-'
 |`-._`-._    `-.__.-'    _.-'_.-'|
 |    `-._`-._        _.-'_.-'    |
  `-._    `-._`-.__.-'_.-'    _.-'
      `-._    `-.__.-'    _.-'
          `-._        _.-'
              `-.__.-'

[1] 23 Mar 19:37:36.865 # Server started, Redis version 2.8.19
[1] 23 Mar 19:37:36.865 # WARNING you have Transparent Huge Pages (THP) support enabled in your kernel. This will create latency and memory usage issues with Redis. To fix this issue run the command 'echo never > /sys/kernel/mm/transparent_hugepage/enabled' as root, and add it to your /etc/rc.local in order to retain the setting after a reboot. Redis must be restarted after THP is disabled.
[1] 23 Mar 19:37:36.865 * The server is now ready to accept connections on port 6379
[1] 23 Mar 19:39:39.458 * Slave 10.24.3.3:6379 asks for synchronization
[1] 23 Mar 19:39:39.458 * Full resync requested by slave 10.24.3.3:6379
[1] 23 Mar 19:39:39.458 * Starting BGSAVE for SYNC with target: disk
[1] 23 Mar 19:39:39.458 * Background saving started by pid 8
[8] 23 Mar 19:39:39.473 * DB saved on disk
[8] 23 Mar 19:39:39.474 * RDB: 0 MB of memory used by copy-on-write
[1] 23 Mar 19:39:39.538 * Background saving terminated with success
[1] 23 Mar 19:39:39.539 * Synchronization with slave 10.24.3.3:6379 succeeded
[1] 23 Mar 19:39:40.023 * Slave 10.24.4.3:6379 asks for synchronization
[1] 23 Mar 19:39:40.023 * Full resync requested by slave 10.24.4.3:6379
[1] 23 Mar 19:39:40.023 * Starting BGSAVE for SYNC with target: disk
[1] 23 Mar 19:39:40.024 * Background saving started by pid 9
[9] 23 Mar 19:39:40.026 * DB saved on disk
[9] 23 Mar 19:39:40.027 * RDB: 0 MB of memory used by copy-on-write
[1] 23 Mar 19:39:40.038 * Background saving terminated with success
[1] 23 Mar 19:39:40.038 * Synchronization with slave 10.24.4.3:6379 succeeded
[1] 23 Mar 19:54:52.027 * 1 changes in 900 seconds. Saving...
[1] 23 Mar 19:54:52.027 * Background saving started by pid 10
[10] 23 Mar 19:54:52.031 * DB saved on disk
[10] 23 Mar 19:54:52.031 * RDB: 0 MB of memory used by copy-on-write
[1] 23 Mar 19:54:52.128 * Background saving terminated with success
[1] 23 Mar 20:09:53.028 * 1 changes in 900 seconds. Saving...
[1] 23 Mar 20:09:53.028 * Background saving started by pid 11
[11] 23 Mar 20:09:53.031 * DB saved on disk
[11] 23 Mar 20:09:53.032 * RDB: 0 MB of memory used by copy-on-write
[1] 23 Mar 20:09:53.128 * Background saving terminated with success
[1] 23 Mar 21:25:31.962 * DB saved on disk
[1] 23 Mar 21:25:32.173 * DB saved on disk
hell-web app container logs
(base) skondla@skondla-mac:~/myStage/k8s/gcp/k8sEgine$ kubectl logs frontend-69859f6796-29hr8
AH00558: apache2: Could not reliably determine the server's fully qualified domain name, using 10.24.2.7. Set the 'ServerName' directive globally to suppress this message
AH00558: apache2: Could not reliably determine the server's fully qualified domain name, using 10.24.2.7. Set the 'ServerName' directive globally to suppress this message
[Mon Mar 23 19:41:21.539692 2020] [mpm_prefork:notice] [pid 1] AH00163: Apache/2.4.10 (Debian) PHP/5.6.20 configured -- resuming normal operations
[Mon Mar 23 19:41:21.539950 2020] [core:notice] [pid 1] AH00094: Command line: 'apache2 -D FOREGROUND'
10.142.0.14 - - [23/Mar/2020:19:54:44 +0000] "GET / HTTP/1.1" 200 826 "-" "Mozilla/5.0 (Macintosh; Intel Mac OS X 10_15_3) AppleWebKit/605.1.15 (KHTML, like Gecko) Version/13.0.5 Safari/605.1.15"
10.142.0.14 - - [23/Mar/2020:19:54:44 +0000] "GET /controllers.js HTTP/1.1" 200 759 "http://35.229.81.94/" "Mozilla/5.0 (Macintosh; Intel Mac OS X 10_15_3) AppleWebKit/605.1.15 (KHTML, like Gecko) Version/13.0.5 Safari/605.1.15"
10.142.0.14 - - [23/Mar/2020:19:54:45 +0000] "GET /guestbook.php?cmd=get&key=messages HTTP/1.1" 200 244 "http://35.229.81.94/" "Mozilla/5.0 (Macintosh; Intel Mac OS X 10_15_3) AppleWebKit/605.1.15 (KHTML, like Gecko) Version/13.0.5 Safari/605.1.15"
10.142.0.16 - - [23/Mar/2020:19:54:45 +0000] "GET /favicon.ico HTTP/1.1" 404 437 "http://35.229.81.94/" "Mozilla/5.0 (Macintosh; Intel Mac OS X 10_15_3) AppleWebKit/605.1.15 (KHTML, like Gecko) Version/13.0.5 Safari/605.1.15"
10.142.0.11 - - [23/Mar/2020:19:55:41 +0000] "GET / HTTP/1.1" 200 1184 "-" "Mozilla/5.0 (compatible; Nimbostratus-Bot/v1.3.2; http://cloudsystemnetworks.com)"
10.142.0.16 - - [23/Mar/2020:20:08:24 +0000] "GET / HTTP/1.1" 200 770 "-" "Mozilla/5.0 zgrab/0.x"
10.142.0.11 - - [23/Mar/2020:20:16:10 +0000] "GET / HTTP/1.1" 200 1184 "-" "Mozilla/5.0 (Windows NT 10.0; WOW64) AppleWebKit/537.36 (KHTML, like Gecko) Chrome/51.0.2704.103 Safari/537.36"
10.142.0.15 - - [23/Mar/2020:20:54:02 +0000] "GET / HTTP/1.1" 200 826 "-" "Mozilla/5.0 (Macintosh; Intel Mac OS X 10_15_3) AppleWebKit/605.1.15 (KHTML, like Gecko) Version/13.0.5 Safari/605.1.15"
10.142.0.15 - - [23/Mar/2020:20:54:02 +0000] "GET /guestbook.php?cmd=get&key=messages HTTP/1.1" 200 279 "http://35.229.81.94/" "Mozilla/5.0 (Macintosh; Intel Mac OS X 10_15_3) AppleWebKit/605.1.15 (KHTML, like Gecko) Version/13.0.5 Safari/605.1.15"
10.142.0.15 - - [23/Mar/2020:22:05:08 +0000] "GET /Telerik.Web.UI.WebResource.axd?type=rau HTTP/1.1" 404 400 "-" "Mozilla/5.0 (Windows NT 10.0; Win64; x64) AppleWebKit/537.36 (KHTML, like Gecko) Chrome/60.0.3112.113 Safari/537.36"
10.142.0.13 - - [24/Mar/2020:00:16:53 +0000] "GET / HTTP/1.1" 200 1184 "-" "Mozilla/5.0 (Windows NT 10.0; WOW64) AppleWebKit/537.36 (KHTML, like Gecko) Chrome/51.0.2704.103 Safari/537.36"
DB web API container logs
(base) skondla@skondla-mac:~/myStage/k8s/gcp/k8sEgine$ kubectl logs dbwebapi-676c645974-fpjr8
 * Serving Flask app "dbWebAPI" (lazy loading)
 * Environment: production
   WARNING: This is a development server. Do not use it in a production deployment.
   Use a production WSGI server instead.
 * Debug mode: on
 * Running on https://0.0.0.0:25443/ (Press CTRL+C to quit)
 * Restarting with stat
 * Debugger is active!
 * Debugger PIN: 892-740-420
10.24.5.1 - - [23/Mar/2020 20:57:47] "GET /backup HTTP/1.1" 200 -
10.142.0.15 - - [23/Mar/2020 20:57:47] "GET /favicon.ico HTTP/1.1" 404 -
10.142.0.15 - - [23/Mar/2020 20:58:14] "GET /backup/create HTTP/1.1" 200 -
10.142.0.15 - - [23/Mar/2020 20:58:14] "GET /favicon.ico HTTP/1.1" 404 -
10.142.0.15 - - [23/Mar/2020 20:58:34] "GET /backup/status HTTP/1.1" 200 -
10.142.0.12 - - [23/Mar/2020 20:58:34] "GET /favicon.ico HTTP/1.1" 404 -
10.142.0.16 - - [23/Mar/2020 20:58:49] "GET /backup/delete HTTP/1.1" 200 -
Guestbook App (go lang)
Tear down Kube cluster
(base) skondla@skondla-mac:~/myStage/k8s/gcp/k8sEgine$ terraform destroy
google_container_node_pool.extra-pool: Refreshing state... [id=projects/amplified-name-270419/locations/us-east1-b/clusters/my-first-gke-cluster/nodePools/extra-node-pool]
google_container_cluster.gke-cluster: Refreshing state... [id=projects/amplified-name-270419/locations/us-east1-b/clusters/my-first-gke-cluster]

An execution plan has been generated and is shown below.
Resource actions are indicated with the following symbols:
  - destroy

Terraform will perform the following actions:

  # google_container_cluster.gke-cluster will be destroyed
(base) skondla@skondla-mac:~/apps/redis/src$ kubectl get pods
The connection to the server xx.xxx.xx.xxx was refused - did you specify the right host or port?
(base) skondla@skondla-mac:~/apps/redis/src$

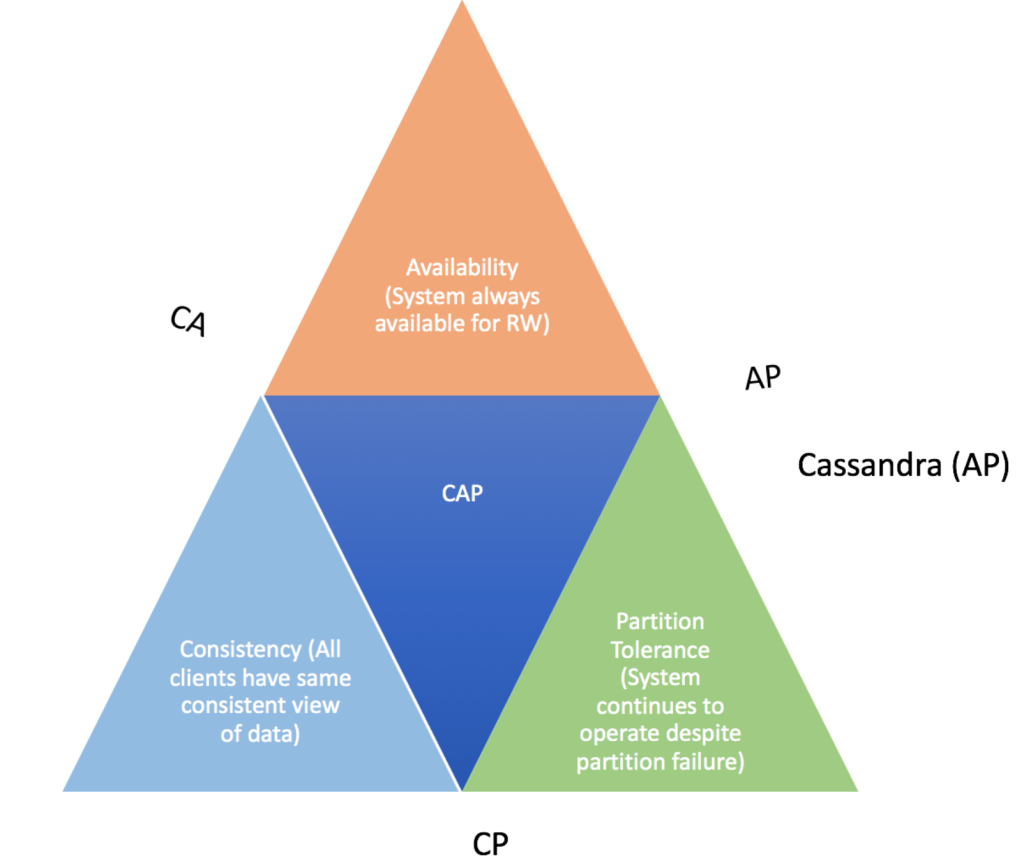
Before we begin, understand the CAP theorem
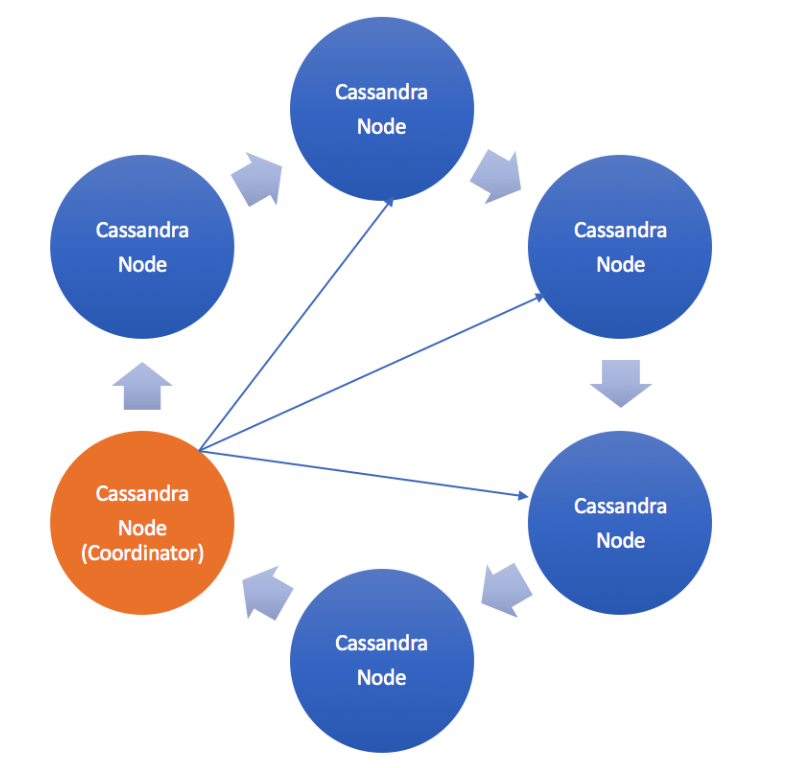
What is Cassandra database?
Architecture:
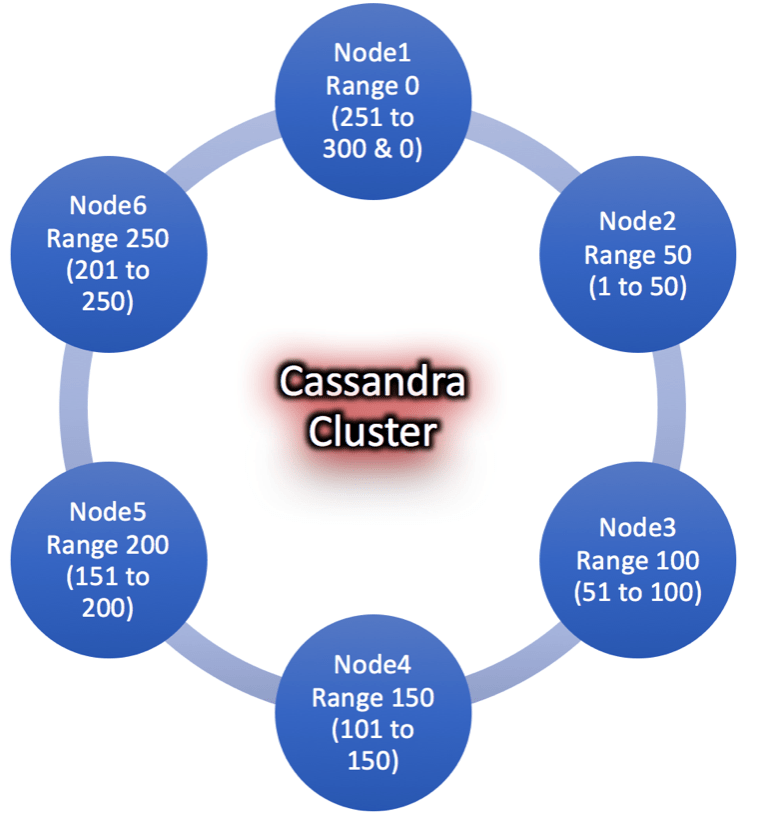
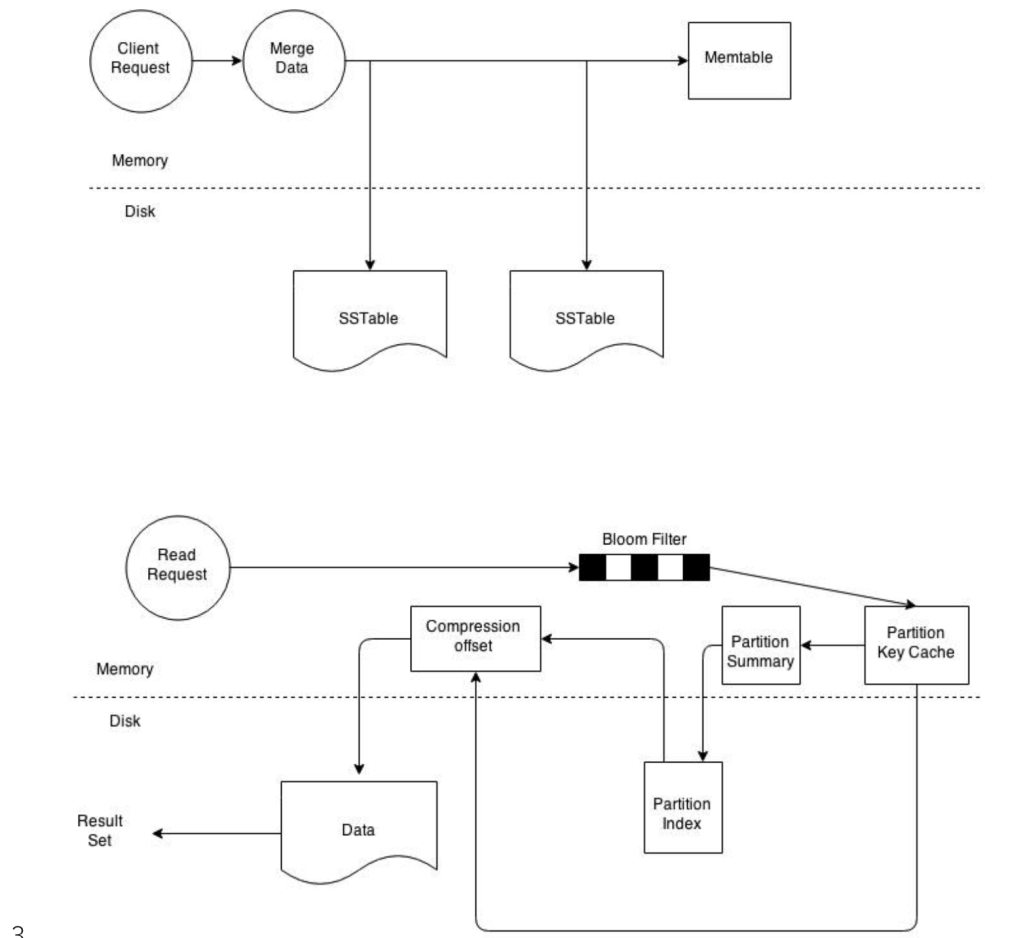
Key Terms and Concepts (Cassandra 101):
Best Practices and Considerations:
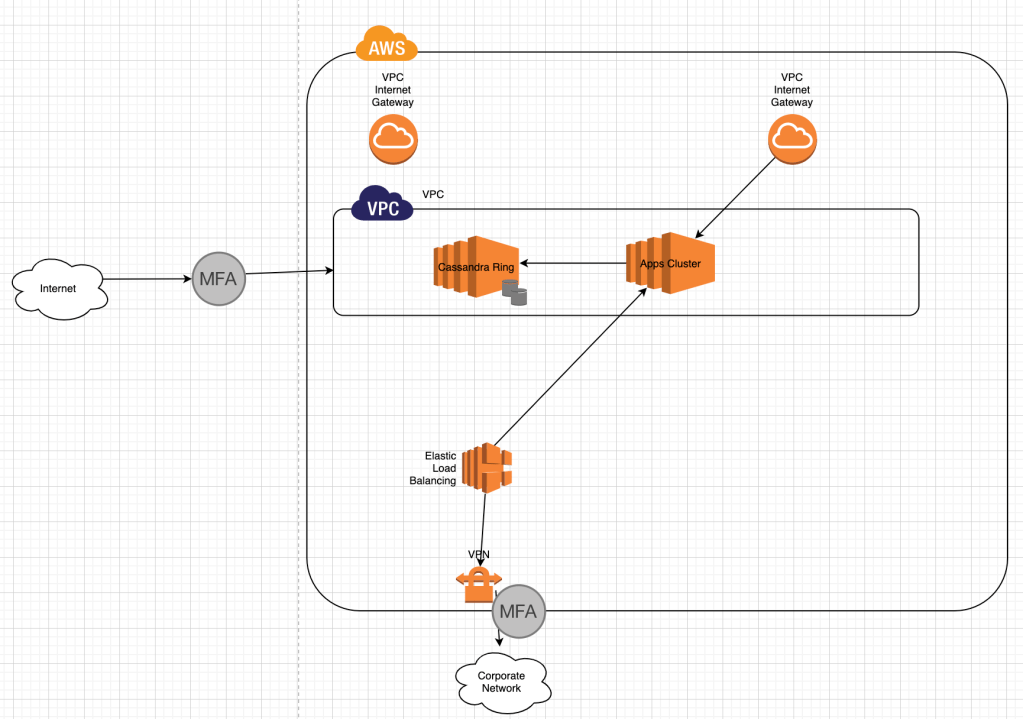
Cassandra Ring in AWS
Performance Tuning:
Tools & Maintenance:
Cassandra Tools & Maintenance https://lake.data.blog/2020/02/16/cassandra-tools-maintenance/Troubleshooting:
Cassandra Stress Test
Cassandra-stress tool is java base stress testing utility for basic benchmarking and load testing a Cassandra cluster. Data modeling choices will affect application performance. Significant load testing over several trials is the best way to discover issues with specific data model. The cassandra-stress tool is an effective tool for populating a cluster and stress testing CQL tables and queries. Use cassandra-stress to:
$ nodetool
usage: nodetool [(-pwf <passwordFilePath> | --password-file <passwordFilePath>)]
        [(-pw <password> | --password <password>)] [(-p <port> | --port <port>)]
        [(-u <username> | --username <username>)] [(-h <host> | --host <host>)]
        <command> [<args>]

The most commonly used nodetool commands are:
    assassinate                  Forcefully remove a dead node without re-replicating any data.  Use as a last resort if you cannot removenode
    bootstrap                    Monitor/manage node's bootstrap process
    cleanup                      Triggers the immediate cleanup of keys no longer belonging to a node. By default, clean all keyspaces
    clearsnapshot                Remove the snapshot with the given name from the given keyspaces. If no snapshotName is specified we will remove all snapshots
    compact                      Force a (major) compaction on one or more tables or user-defined compaction on given SSTables
    compactionhistory            Print history of compaction
    compactionstats              Print statistics on compactions
    decommission                 Decommission the *node I am connecting to*
    describecluster              Print the name, snitch, partitioner and schema version of a cluster
    describering                 Shows the token ranges info of a given keyspace
    disableautocompaction        Disable autocompaction for the given keyspace and table
    disablebackup                Disable incremental backup
    disablebinary                Disable native transport (binary protocol)
    disablegossip                Disable gossip (effectively marking the node down)
    disablehandoff               Disable storing hinted handoffs
    disablehintsfordc            Disable hints for a data center
    disablethrift                Disable thrift server
    drain                        Drain the node (stop accepting writes and flush all tables)
    enableautocompaction         Enable autocompaction for the given keyspace and table
    enablebackup                 Enable incremental backup
    enablebinary                 Reenable native transport (binary protocol)
    enablegossip                 Reenable gossip
    enablehandoff                Reenable future hints storing on the current node
    enablehintsfordc             Enable hints for a data center that was previsouly disabled
    enablethrift                 Reenable thrift server
    failuredetector              Shows the failure detector information for the cluster
    flush                        Flush one or more tables
    gcstats                      Print GC Statistics
    getcompactionthreshold       Print min and max compaction thresholds for a given table
    getcompactionthroughput      Print the MB/s throughput cap for compaction in the system
    getendpoints                 Print the end points that owns the key
    getinterdcstreamthroughput   Print the Mb/s throughput cap for inter-datacenter streaming in the system
    getlogginglevels             Get the runtime logging levels
    getsstables                  Print the sstable filenames that own the key
    getstreamthroughput          Print the Mb/s throughput cap for streaming in the system
    gettimeout                   Print the timeout of the given type in ms
    gettraceprobability          Print the current trace probability value
    gossipinfo                   Shows the gossip information for the cluster
    help                         Display help information
    info                         Print node information (uptime, load, ...)
    invalidatecountercache       Invalidate the counter cache
    invalidatekeycache           Invalidate the key cache
    invalidaterowcache           Invalidate the row cache
    join                         Join the ring
    listsnapshots                Lists all the snapshots along with the size on disk and true size.
    move                         Move node on the token ring to a new token
    netstats                     Print network information on provided host (connecting node by default)
    pausehandoff                 Pause hints delivery process
    proxyhistograms              Print statistic histograms for network operations
    rangekeysample               Shows the sampled keys held across all keyspaces
    rebuild                      Rebuild data by streaming from other nodes (similarly to bootstrap)
    rebuild_index                A full rebuild of native secondary indexes for a given table
    refresh                      Load newly placed SSTables to the system without restart
    refreshsizeestimates         Refresh system.size_estimates
    reloadtriggers               Reload trigger classes
    relocatesstables             Relocates sstables to the correct disk
    removenode                   Show status of current node removal, force completion of pending removal or remove provided ID
    repair                       Repair one or more tables
    replaybatchlog               Kick off batchlog replay and wait for finish
    resetlocalschema             Reset node's local schema and resync
    resumehandoff                Resume hints delivery process
    ring                         Print information about the token ring
    scrub                        Scrub (rebuild sstables for) one or more tables
    setcachecapacity             Set global key, row, and counter cache capacities (in MB units)
    setcachekeystosave           Set number of keys saved by each cache for faster post-restart warmup. 0 to disable
    setcompactionthreshold       Set min and max compaction thresholds for a given table
    setcompactionthroughput      Set the MB/s throughput cap for compaction in the system, or 0 to disable throttling
    sethintedhandoffthrottlekb   Set hinted handoff throttle in kb per second, per delivery thread.
    setinterdcstreamthroughput   Set the Mb/s throughput cap for inter-datacenter streaming in the system, or 0 to disable throttling
    setlogginglevel              Set the log level threshold for a given class. If both class and level are empty/null, it will reset to the initial configuration
    setstreamthroughput          Set the Mb/s throughput cap for streaming in the system, or 0 to disable throttling
    settimeout                   Set the specified timeout in ms, or 0 to disable timeout
    settraceprobability          Sets the probability for tracing any given request to value. 0 disables, 1 enables for all requests, 0 is the default
    snapshot                     Take a snapshot of specified keyspaces or a snapshot of the specified table
    status                       Print cluster information (state, load, IDs, ...)
    statusbackup                 Status of incremental backup
    statusbinary                 Status of native transport (binary protocol)
    statusgossip                 Status of gossip
    statushandoff                Status of storing future hints on the current node
    statusthrift                 Status of thrift server
    stop                         Stop compaction
    stopdaemon                   Stop cassandra daemon
    tablehistograms              Print statistic histograms for a given table
    tablestats                   Print statistics on tables
    toppartitions                Sample and print the most active partitions for a given column family
    tpstats                      Print usage statistics of thread pools
    truncatehints                Truncate all hints on the local node, or truncate hints for the endpoint(s) specified.
    upgradesstables              Rewrite sstables (for the requested tables) that are not on the current version (thus upgrading them to said current version)
    verify                       Verify (check data checksum for) one or more tables
    version                      Print cassandra version
    viewbuildstatus              Show progress of a materialized view build

See 'nodetool help <command>' for more information on a specific command.
This document helps you understand tools needed to maintain Cassandra cluster. Following tools you may use to maintain Cassandra ring.
Tools:
-h--hostHostname or IP address.-p--portPort number.-pwf--password-filePassword file path.-pw--passwordPassword.-u--usernameRemote JMX agent username.nodetool repair command initiates the repair process on a specific node which in turn computes a Merkle tree for each range of data on that node. The merkle tree is a binary tree of hashes used by Cassandra for calculating the differences in datasets between nodes in a cluster. Every time a repair is carried out, the tree has to be calculated, each node that is involved in the repair has to construct its merkle tree from all the sstables it stores making the calculation very expensive. This allows for repairs to be network efficient as only targeted rows identified by the merkle tree as inconsistencies are sent across the network.GC_GRACE_SECONDSConsistency levels in Cassandra can be configured to manage availability versus data accuracy. Configure consistency for a session or per individual read or write operation. Within cqlsh, use CONSISTENCY, to set the consistency level for all queries in the current cqlsh session. For programming client applications, set the consistency level using an appropriate driver. For example, using the Java driver, call QueryBuilder.insertInto with setConsistencyLevel to set a per-insert consistency level.
The consistency level defaults to ONE for all write and read operations.Write Consistency Levels
| Level | Description | Usage |
|---|---|---|
ALL | A write must be written to the commit log and memtable on all replica nodes in the cluster for that partition. | Provides the highest consistency and the lowest availability of any other level. |
EACH_QUORUM | Strong consistency. A write must be written to the commit log and memtableon a quorum of replica nodes in eachdatacenter. | Used in multiple datacenter clusters to strictly maintain consistency at the same level in each datacenter. For example, choose this level if you want a read to fail when a datacenter is down and the QUORUM cannot be reached on that datacenter. |
QUORUM | A write must be written to the commit log and memtable on a quorum of replica nodes across all datacenters. | Used in either single or multiple datacenter clusters to maintain strong consistency across the cluster. Use if you can tolerate some level of failure. |
LOCAL_QUORUM | Strong consistency. A write must be written to the commit log and memtableon a quorum of replica nodes in the same datacenter as the coordinator. Avoids latency of inter-datacenter communication. | Used in multiple datacenter clusters with a rack-aware replica placement strategy, such as NetworkTopologyStrategy, and a properly configured snitch. Use to maintain consistency locally (within the single datacenter). Can be used withSimpleStrategy. |
ONE | A write must be written to the commit log and memtable of at least one replica node. | Satisfies the needs of most users because consistency requirements are not stringent. |
TWO | A write must be written to the commit log and memtable of at least two replica nodes. | Similar to ONE. |
THREE | A write must be written to the commit log and memtable of at least three replica nodes. | Similar to TWO. |
LOCAL_ONE | A write must be sent to, and successfully acknowledged by, at least one replica node in the local datacenter. | In a multiple datacenter clusters, a consistency level of ONE is often desirable, but cross-DC traffic is not. LOCAL_ONE accomplishes this. For security and quality reasons, you can use this consistency level in an offline datacenter to prevent automatic connection to online nodes in other datacenters if an offline node goes down. |
ANY | A write must be written to at least one node. If all replica nodes for the given partition key are down, the write can still succeed after a hinted handoff has been written. If all replica nodes are down at write time, an ANY write is not readable until the replica nodes for that partition have recovered. | Provides low latency and a guarantee that a write never fails. Delivers the lowest consistency and highest availability. |
This table describes read consistency levels in strongest-to-weakest order. Read Consistency Levels
| Level | Description | Usage |
|---|---|---|
ALL | Returns the record after all replicas have responded. The read operation will fail if a replica does not respond. | Provides the highest consistency of all levels and the lowest availability of all levels. |
EACH_QUORUM | Not supported for reads. | |
QUORUM | Returns the record after a quorum of replicas from all datacenters has responded. | Used in either single or multiple datacenter clusters to maintain strong consistencyacross the cluster. Ensures strong consistency if you can tolerate some level of failure. |
LOCAL_QUORUM | Returns the record after a quorum of replicas in the current datacenter as the coordinator has reported. Avoids latency of inter-datacenter communication. | Used in multiple datacenter clusters with a rack-aware replica placement strategy (NetworkTopologyStrategy) and a properly configured snitch. Fails when using SimpleStrategy. |
ONE | Returns a response from the closest replica, as determined by the snitch. By default, a read repair runs in the background to make the other replicas consistent. | Provides the highest availability of all the levels if you can tolerate a comparatively high probability of stale data being read. The replicas contacted for reads may not always have the most recent write. |
TWO | Returns the most recent data from two of the closest replicas. | Similar to ONE. |
THREE | Returns the most recent data from three of the closest replicas. | Similar to TWO. |
LOCAL_ONE | Returns a response from the closest replica in the local datacenter. | Same usage as described in the table about write consistency levels. |
SERIAL | Allows reading the current (and possibly uncommitted) state of data without proposing a new addition or update. If a SERIAL read finds an uncommitted transaction in progress, it will commit the transaction as part of the read. Similar to QUORUM. | To read the latest value of a column after a user has invoked a lightweight transactionto write to the column, use SERIAL. Cassandra then checks the inflight lightweight transaction for updates and, if found, returns the latest data. |
LOCAL_SERIAL | Same as SERIAL, but confined to the datacenter. Similar to LOCAL_QUORUM. | Used to achieve linearizable consistencyfor lightweight transactions. |
The QUORUM level writes to the number of nodes that make up a quorum. A quorum is calculated, and then rounded down to a whole number, as follows:
quorum = (sum_of_replication_factors / 2) + 1
The sum of all the replication_factor settings for each datacenter is thesum_of_replication_factors.
sum_of_replication_factors = datacenter1_RF + datacenter2_RF + . . . + datacentern_RF
Examples:
The more datacenters, the higher number of replica nodes need to respond for a successful operation.
Similar to QUORUM, the LOCAL_QUORUM level is calculated based on the replication factor of the same datacenter as the coordinator node. That is, even if the cluster has more than one datacenter, the quorum is calculated only with local replica nodes.
In EACH_QUORUM, every datacenter in the cluster must reach a quorum based on that datacenter’s replication factor in order for the read or write request to succeed. That is, for every datacenter in the cluster a quorum of replica nodes must respond to the coordinator node in order for the read or write request to succeed.
You can use a cqlsh command, CONSISTENCY, to set the consistency level for queries in the current cqlsh session. For programming client applications, set the consistency level using an appropriate driver. For example, call QueryBuilder.insertInto with a setConsistencyLevel argument using the Java driver.
Issues with SERIAL AND LOCAL_SERIAL consistency levels
binlog_format parameter for your source DB cluster.binlog_format parameter is a cluster-level parameter that is in the default.aurora5.6 cluster parameter group by default. References:
Cost Estimates: Approximate Cost estimates for Multi-Region / Global Database

Related articles appear here based on the labels you select. Click to edit the macro and add or change labels.
I came from world of Oracle technology stack where I worked a long time with Oracle RAC clusters on Linux/Exadata platforms until I stared to look at open source world on cloud infrastructure few years ago. Like many, I was thinking, what would it take me to build a scalable database storage platform always available and fault tolerant highly resilient to single point of failures on open cloud platform.
Though, AWS Aurora fits into some of the features mentioned above and able to scale up to 15 replicas, I often tend to ask the question myself, what is the point in using replicas when they cannot be load balanced to use maximum available compute. In my situation, for example I have 2 replicas and single master, however replicas rarely being used by application for off-loading reads wasting valuable compute resources, while master instance is over-whelmed with maximum peak load. I was excited when AWS announced multi-master Aurora cluster back in 2017 re-invent , but until now I don’t see that coming.
I asked AWS team about another option something similar to a query router when deployed, it routes read requests appropriately to replicas or slave instances. Today, our development team struggle to get it working through the app code and hard to manage routing traffic efficiently. I looked at another solution from a third party called ScaleArc to do the job. Below are few architectural diagrams I created and how it works

Current Setup

DB query router

DB query router in HA
I started to think about how I can make database service requests more agile and self served. As a Cloud Data platform architect I have access to full resources however, often times I overwhelmed with requests people think I am responsible for , but I am not really, the DBAs are. The point I am making here is, how well I can integrate db services into CI/CD pipelines and/or deployment work flows. During each release, devOps request a database snapshot be taken prior to deployment.
I developed a webApp written using python flask web framework to expose RESTful API calls using AWS python SDK. the flask application use API calls defined as routes
Below is the diagram depicts a simple architectural diagram

The web interface (HTML) or curl command can be used to request for a
API app is written using Python Flask Web Frame work with API endpoints called routes. The tool can be used in two forms


webApp via HTTPS or CURL
#Main Page
#https://10.10.x.x:25443/backup
#create cluster db snapshot
curl -k https://10.10.x.x:25443/backup/create \
 --data "endpoint=mydB1-net1.us-east-1.rds.amazonaws.com"; \
 echo
#https://10.10.x.x:25443/backup/create
#check cluster db snapshot
curl -k https://10.10.x.x:25443/backup/status \
 --data "snapshotname=mydB1-2018-06-24-22-21-57" \
 --data "endpoint=mydB1.cluster-ro-net1.us-east-1.rds.amazonaws.com"; \
 echo
#https://10.10.x.x:25443/backup/status
#delete cluster db snapshot
curl -k https://10.10.x.x:25443/backup/delete \
 --data "snapshotname=mydB1-2018-06-24-22-21-57" \
 --data "endpoint=mydB1.cluster-ro-net1.us-east-1.rds.amazonaws.com"; \
 echo
#https://10.10.x.x:25443/backup/delete
#!/bin/bash#Author: Sudheer Kondla, 06/27/2018 if [ $# -lt 1 ];thenecho "USAGE: bash $0 [require Fully Qualified db endpoint]"exit 1fidbEndPoint=$1 /usr/bin/curl -k https://10.10.x.x:25443/backup/create \--data "endpoint=${dbEndPoint}"; echo |
The web interface (HTML) or CURL command can be used to request for a
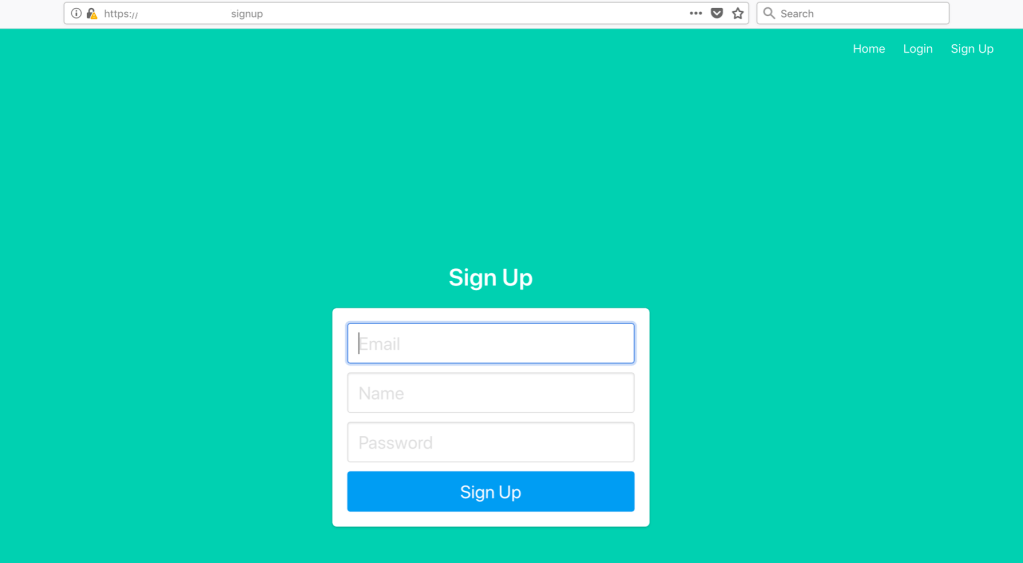
Request website credentials: Provide your email for web site sign up. Sign up is only available to Admins through Admin console. Apps with both Admin and User interfaces are running on dB API server(s) in a docker container mapped to different ports.
Admin Console:
Login Page

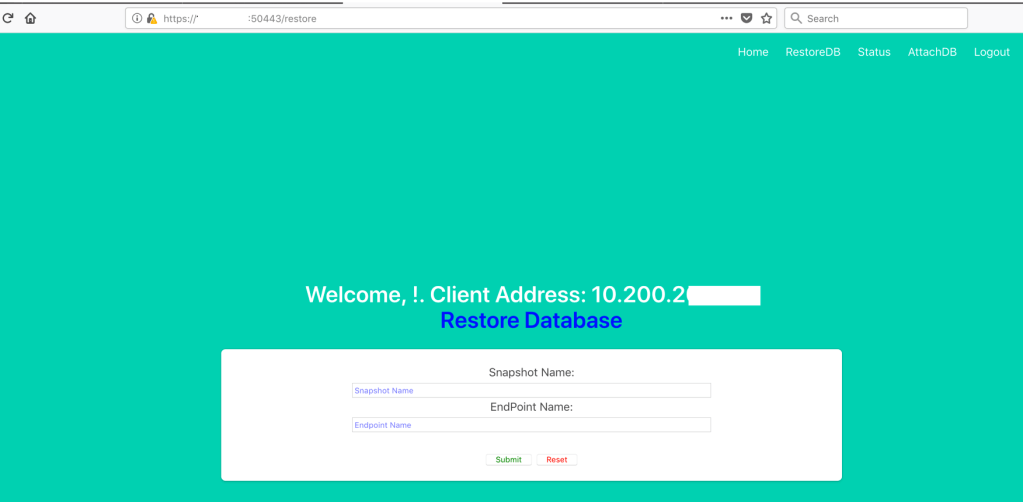
Restore Database Page
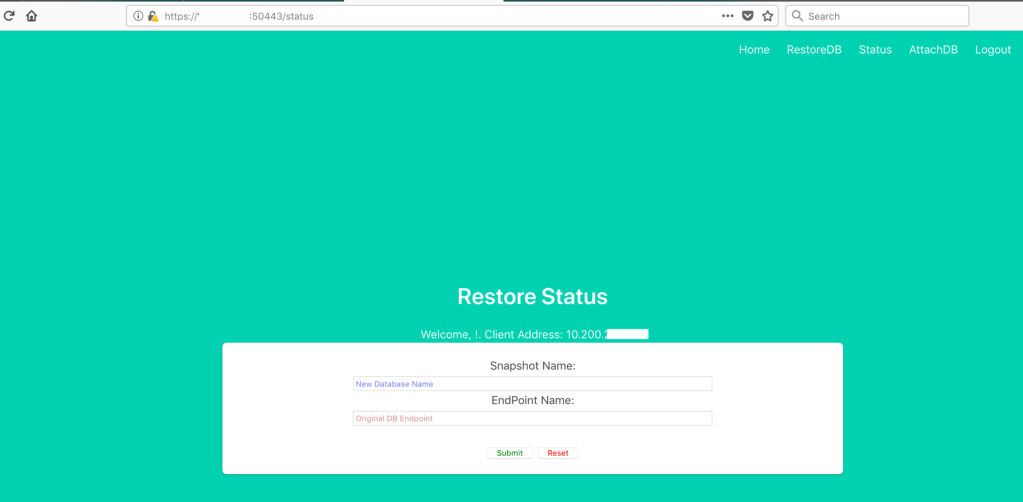
Restore DB Status Page
Attach dB instance to the dB cluster Page

In order to get to functional page of web site, you need to provide login authentication first to pass that session information via SecureCookieSession
Flask Python Curl command: (how to use) Restore backup:
#!/bin/bash
#Author: skondla@me.com
#Purpose: Restore DB from a Snapshot

if [ $# -lt 2 ];
then
    echo "Provide snapshotname , db endpoint"
    echo "example: bash getDBRestoreStatus.sh myDB
    myDB.cluster-XXXYYYYDDDD.us-east-1.rds.amazonaws.com"
exit 1
fi

snapshotname=${1}
endpoint=${2}


EMAIL=`cat ~/.password/mySecrets2 | grep email | awk '{print $2}'`
PASSWORD=`cat ~/.password/mySecrets2 | grep password | awk '{print $2}'`


#/usr/bin/curl -k "https://ec2-54.94.x.x.compute-1.amazonaws.com:50443/login" \
/usr/bin/curl -k "https://192.168.2.15:50443/login" \
    --data-urlencode "email=${EMAIL}" \
    --data-urlencode "password=${PASSWORD}" \
    --cookie "cookies.txt" \
    --cookie-jar "cookies.txt" \
    --verbose \
    > "login_log.html"

#/usr/bin/curl -k "https://ec2-54.94.x.x.compute-1.amazonaws.com:50443/restore" \
/usr/bin/curl -k "https://192.168.2.15:50443/restore" \
    --data-urlencode "snapshotname=${snapshotname}" \
    --data-urlencode "endpoint=${endpoint}" \
    --cookie "cookies.txt" \
    --verbose \
    --cookie-jar "cookies.txt"; \
    echo
rm -f cookies.txt
Status of Restored backup:
#!/bin/bash
#Author: skondla@me.com
#Purpose: Status of Restore

if [ $# -lt 2 ];
then
    echo "Provide snapshotname , db endpoint"
    echo "example: bash getDBRestoreStatus.sh myDB
    myDB.cluster-XXXYYYYDDDD.us-east-1.rds.amazonaws.com"
exit 1
fi

snapshotname=${1}
endpoint=${2}


EMAIL=`cat ~/.password/mySecrets2 | grep email | awk '{print $2}'`
PASSWORD=`cat ~/.password/mySecrets2 | grep password | awk '{print $2}'`


#/usr/bin/curl -k "https://ec2-54.94.x.x.compute-1.amazonaws.com:50443/login" \
/usr/bin/curl -k "https://192.168.2.15:50443/login" \
    --data-urlencode "email=${EMAIL}" \
    --data-urlencode "password=${PASSWORD}" \
    --cookie "cookies.txt" \
    --cookie-jar "cookies.txt" \
    --verbose \
    > "login_log.html"

#/usr/bin/curl -k "https://ec2-54.94.x.x.compute-1.amazonaws.com:50443/status" \
/usr/bin/curl -k "https://192.168.2.15:50443/restore" \
    --data-urlencode "snapshotname=${snapshotname}" \
    --data-urlencode "endpoint=${endpoint}" \
    --cookie "cookies.txt" \
    --verbose \
    --cookie-jar "cookies.txt"; \
    echo
rm -f cookies.txt
Attach DB instance to the cluster:
#!/bin/bash
#Author: skondla@me.com
#Purpose: Attach dB instance to dB cluster

if [ $# -lt 2 ];
then
    echo "Provide db endpoint , instanceclass"
    echo "example: bash getDBRestoreStatus.sh
          myDB.cluster-XXXYYYYDDDD.us-east-1.rds.amazonaws.com
          db.t2.small"
exit 1
fi


endpoint=${1}
instanceclass=${2}


EMAIL=`cat ~/.password/mySecrets2 | grep email | awk '{print $2}'`
PASSWORD=`cat ~/.password/mySecrets2 | grep password | awk '{print $2}'`

#/usr/bin/curl -k "https://ec2-54.94.x.x.compute-1.amazonaws.com:50443/login" \
/usr/bin/curl -k "https://192.168.2.15:50443/login" \
    --data-urlencode "email=${EMAIL}" \
    --data-urlencode "password=${PASSWORD}" \
    --cookie "cookies.txt" \
    --cookie-jar "cookies.txt" \
    --verbose \
    > "login_log.html"

#/usr/bin/curl -k "https://ec2-54.94.x.x.compute-1.amazonaws.com:50443/attachdb" \
/usr/bin/curl -k "https://192.168.2.15:50443/attachdb" \
    --data-urlencode "endpoint=${endpoint}" \
    --data-urlencode "instanceclass=${instanceclass}" \
    --cookie "cookies.txt" \
    --verbose \
    --cookie-jar "cookies.txt"; \
    echo

rm -f cookies.txt
Source code:
email me: skondla@me.com
